Thursday, May 8, 2014

Mother's Day Craft - Day 4 - Handprint Corkboard

I think that every mom loves getting something with your child's hand print on it.  When Alex was in daycare, I loved when he would bring home his artwork with his hand print on it.  Those are the things that you save, the things you look back at as they grow bigger and bigger each year.

Today, Alex, Amelia, and I created a cork board with a hand print border.  Cork boards are a great thing to have around the house.  They are great places to hang pictures, drawings, or reminder notes.  I need to hand Alex's kindergarten supply list on this one so that I remember to get everything that he needs for the school year.

I bought the cork board at Joann's for under $4 and a few scrapbook pages to cut out the hand prints. I let Alex pick out two sheets for himself and two sheets for Amelia.

I started by cutting out two hand prints out of each piece of paper - a total of 4 of each child.  Alex's hands were easy to trace but it is always fun trying to trace the hand of a 9 month old active baby.  I only traced one hand of each child and used that one for a pattern for each of the other prints.  I decided that was much easier than trying to trace her hand over and over.

I then glued ribbon around the edge of the entire border of the cork board.  I started with Washi tape but it would not stick.  It just kept pulling off.

After that, I arranged the hands around the border and glued each down.  It is as simple as that and super cute.  I cannot wait to hang it up and start using it.  What a great way to always see how little your kids were as they grow right before your eyes?

This is a very easy project and completely adaptable to the colors that you would like.  You could also dot paint a border and use cute stickers.  Be creative and make it yours!

Mother's Day Craft - Day 3 - Paper Floral Arrangement

While I was at the thrift store, I was walking around and just happened upon this little pink bucket and knew I could do something with it.  I decided that I would create a floral arrangement with paper flowers.  I am horrible with real flowers so paper and fabric ones are great for me.

I started this project with Alex and I going outside and gathering sticks.  What four year old little boy does not like going outside and gathering sticks?  After collecting 10 sticks we came back in and started cutting out some paper flowers.

Before we started making and arranging the flowers, Alex poured a bag of dried beans into the bucket.  The dried beans help the sticks stand up and are lightweight.

I laid the flowers down and had Alex tape the sticks to the flowers.  Alex LOVES tape.  It can be found all over our house on lots of different surfaces.


We then placed the flowers in the bucket arranging them as we went.

Lastly, we took the bucket outside and added a few rocks to the top to cover the beans and help steady the flowers even more.

I have to say it turned out pretty cute.  Moms love homemade gifts from there kids and this is a really cute and easy one for any mom!


Wednesday, May 7, 2014

Homemade Salsa

The tomatoes with the vine still attached looked so good at the market yesterday so I bought a bunch of them.  One of my favorite things to eat is salsa.  It is the one thing that I craved when I was pregnant with my son.  It is a great treat that is healthy and tasty.  I also now know that it is super simple to whip up a batch.

Ingredients:
Tomatoes - I used on the vine, quartered and deseeded.  I used about 8.
Cilantro - minced - I used about 2 tablespoons.  You can adjust to your taste.
Jalapeno - 2 chopped
1 bunch of green onions - chopped - any onion will do, this is just what I had on hand
salt to taste
Juice of half a lime


I started by quartering and deseeding the tomatoes.  I then placed them in a very hot dry skillet to get some char on the skin.  It just a takes a minute or two.  Watch them so they do not burn.  I then placed them in my blender to cool while I chopped the rest of the ingredients

I then chopped up the cilantro, jalapenos, and onions and added them to the tomatoes.


I pulsed the blender about 6 times or so.  This is very dependent on your blender or food processor. My old blender would have needed more but my new Ninja is AWESOME!!!!!  Best Christmas present ever!!

Add salt to your liking.  I used about a tablespoon.  I am not one for adding much salt but for me salsa is something that begs for it.  I also added the juice of half a lime at this point.  Pulse 1 or 2 more times and there you have it.  Pour in a bowl and let it sit for at least on hour in the fridge. It will just get better!

Serve with tortilla chips.

Tuesday, May 6, 2014

Mother's Day Craft - Day 2 - DIY Floral Picture Frame from Thrift Store Items

Today's craft would be great for any mom or granny that loves to take pictures of the kids.  I know my mom always has her camera with her anytime she is with the kids for any reason.  She loves to take pictures and always needs another picture frame.

I started by taking a quick trip to the thrift store to pick up a picture frame and some fabric flowers. I got lucky and found both.  I paid $0.69 for 5x7 frame and $0.99 for a bag of fabric flowers.  Fabric flowers are great for me because real flowers and I do not get along.  I am the person that managed to kill a cactus garden.  Never even knew that was possible until it happened to me.


I started by pulling most of the flowers off the stems.  I then put glue around the perimeter of the frame.

I then let Alex place the flowers around the frame.  I then went back and filled in a few places.


The frame turned from a plain navy frame to a beautiful floral picture frame worthy of any picture of kids.

This was simple and easy for small kids to do.  It was also inexpensive for those that are on a budget.


Be creative and have fun!  If your mom likes feathers, to sew (you could glue on buttons), or has another hobby, feel free to personalize the frame to her likes!


Monday, May 5, 2014

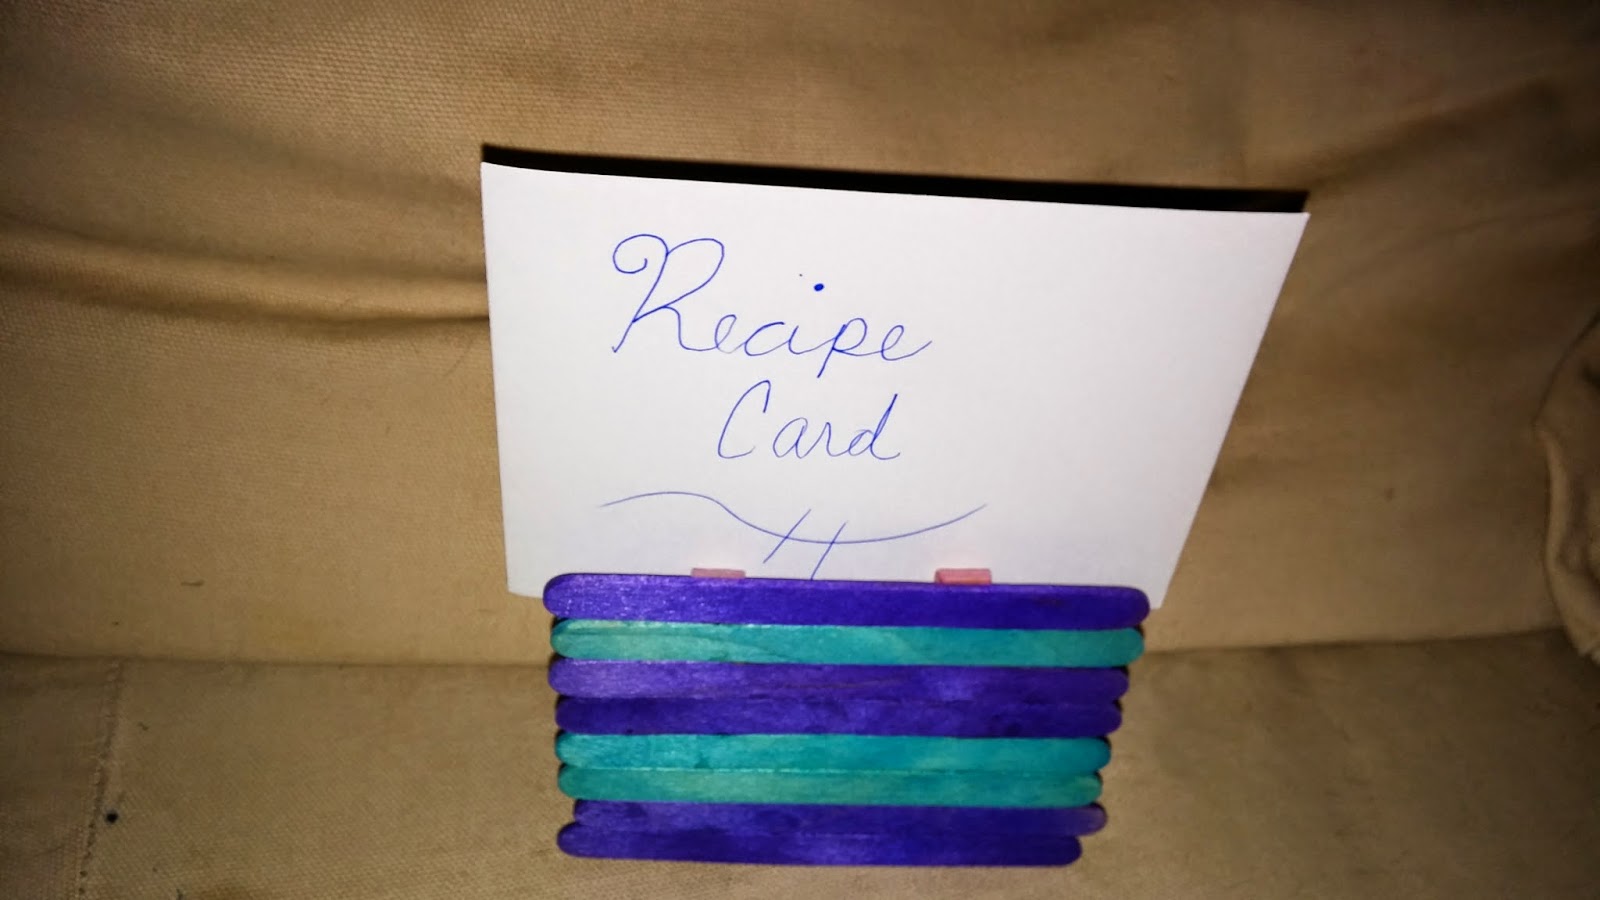
Mother's Day Crafts - Day One - Recipe Card Holder

Mother's Day is quickly approaching and it is that time where we show are mother's in a special way how much we are care for and appreciate them.  This week I will be doing a daily craft that kids can make with for their mom, granny, or any other special woman in their lives.
Today's project took under 10 minutes to create and is great for the mom that loves to cook and bake.  My mom loves to bake goodies for the kids, so I decided to start the week with an easy recipe holder.

Materials:
16 colored Popsicle sticks
glue
two clothes pins


I just happen to have some colored Popsicle sticks on hand from using them in my classroom, but if you do not here is how you can color them.

http://www.ehow.com/how_7745421_stain-popsicle-sticks.html


First, you will put a stripe of glue onto each clothes pin.  Laying them apart from each other enough to leave just a little over hang from the Popsicle sticks, lay down the Popsicle sticks down until you reach the end of the clothes pins.  It will take 8 per side.


 Turn the whole thing over and repeat on the other side.  You will now just need to let it dry.  You can even add a recipe for that special extra touch.

This would also be a great time to work on patterns with your child.  Put the Popsicle sticks in a pattern to make it even neater.  Have fun and enjoy making a special gift for that special Mom in your life!


Sunday, May 4, 2014

Birthday Present for Granny - Hand Print Apron

Tomorrow is my mom's birthday.  One of her favorite things to get for her birthday is something handmade from the grandkids.  I decided to take Alex and Amelia to let them pick out something they would like to make for Granny and something that she would also enjoy getting as a present. Well, I guess it was mostly Alex choosing since Amelia is just 9 months old.  He finally settled on a red apron and some puffy fabric paint.  He chose hot pink (Granny's favorite), green, and grey.  They grey and hot pink are also glow in the dark.  I mean what Granny does not want an apron made with glow in the dark paint??

I started the project by laying the apron in the kitchen floor.  You will need a flt spot to do this project because the paint will have to lay flat for several hours.  I then used chalk to make an outline of each of the kid's hand to trace with the paint and turn into flowers.  I then let Alex decorate as he wanted.  My mother loves gifts that shows the kid's creativity.  My mom is a former preschool teacher and loves things that show what a child can do.  This can be a little messy but that is okay. If you want your apron to be neater, you can just trace the hand prints and do the decorations yourself.


This is a super simple project to create and very easy to personalize for the person that you are making.  Don't be afraid the let your child be creative even if it means things will get a little messy. It may look messy in your eyes, but BEAUTIFUL in Granny's eyes!  Be creative and have fun!


Thursday, May 1, 2014

Making a Cute One Shoulder Tank From a Men's T-shirt

It has been a few days since my last post.  It has been a very busy last few days.  Today we had to take my son to the dentist for some dental work.  That was a whole lot of fun.  He refused to take his medicine, spit the first one out and bit me while I gave him the second.  He has never really fought meds before but today he was just not having it.  After that, he did great!  The dentist said everything was good and Alex got his balloon.  A balloon from a doctor is so important when you are four.

Anywho, here is the shirt that I made a few days ago.  I love tank tops in the summer.  I mean, it is already going to be almost 90 next week.  Living in the south almost demands wearing tank top in April and early May.  I already wear flip flops 95% of the year.

I found a great website with a lot of DIY t-shirts and thought they looked so easy so I tried one.  It really was simple.  In under 10 minutes I had a very adorable tank made from a man's t-shirt that I bought at the thrift store for $1.99.  I figured buying one at the thrift store was a great idea just in case it did not turn out well.  Fortunately, it turned out great and I will be trying more of her DIY t shirts.  There are a lot of really cute ideas on her site.

Here is the link:http://wobisobi.blogspot.com/2013/11/side-tied-shirtdiy.html


This is how I did it.

First, I washed the shirt just like I do all material that I buy to sew.

Next, I laid the shirt out flat.  I think this is important.  You need to make sure that you match all the edges up so that when you make your cuts everything will match up.

Then, I cut around each of the sleeves and cute around the neck. You will have a strap on each side. You will cut across the top of the straps.


I found it easier to put the tank on and then tie the ties to one side while I was wearing it.

That's it. That's all there is to it.  Like I said less than 10 minutes to a cute, new tank top.  I cannot wait to go back to the thrift store to get more t-shirts to try out from her website.  Have fun and be creative!!